Installation
The PDX103, like the PDR100, is designed to be rack mounted. It is mounted with rack slides for easy access. Detailed installation instructions follow. Figure 3 shows an installation that includes the PDR100 Professional Disk Recorder and the PDX103 Video Disk Expansion Unit mounted in a rack.
Figure 3. Typical PDR100 Installation with PDX103 Disk Drive Expansion Unit


Rack Dimensions
The PDX103 Video Disk Expansion unit is shipped with hardware for rack mounting. Figure 4 shows the dimensions. The PDX103 fits in a standard 19-inch (48.3 centimeter) rack. Spacing inside the front rails of the rack must be at least 17 3/4 inches (45.1 centimeter) to allow clearance for the slide-out tracks.
Figure 4. Dimensions of the PDX103 for Rack Mounting Mounting the PDX103
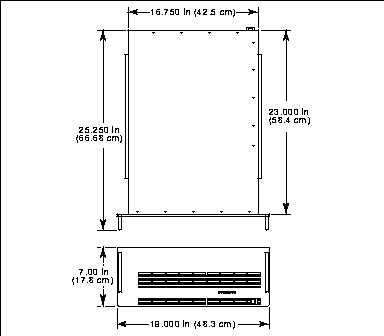
Figure 5. Complete Rack Slide Set for Right Side of PDX103 and Rack Mounting the Slide Tracks in the Rack
Mount the rails using the enclosed hardware as shown in Figure 5. Figures 7 and 8 show the front and rear rail mounting detail for both deep and shallow racks. Make sure the stationary sections are horizontally aligned and are level as well as parallel to each other.
Figure 6. Spacing for Mounting Holes in a Standard Rack
Figure 7. Front Slide Mounting Detail
Figure 8. Rear Slide Mounting Detail


- WARNING: The PDX103 is considered to be too heavy for one person to install. The weight of the PDX103 exceeds 80 pounds. To avoid possible personal injury, do not attempt to install the PDX103 by yourself.

- WARNING: If the rack is not attached to the floor or vertical support, the rack can tip when the PDX103 is out on the rack slides, possibly causing serious injury.
Installing the PDX103 in the Rack Slides
- Pull the slide-out track section to the fully extended position. See Figure 9.
- Insert the ends of the cabinet chassis sections into the slide-out sections.
- Push the cabinet toward the rack until the chassis sections lock into the intermediate sections.
- Press the stop latches in the intermediate sections and push the cabinet toward the rack until the latches snap into their holes.
- Again press the stop latches and push the cabinet fully into the rack.
- Tighten the front-panel retaining screws.

Figure 9. Rack Slide Stop Latch
Rack Slide Adjustments
After installation binding may occur if the slide tracks are not properly adjusted. To adjust the tracks:
- Slide the cabinet out about 10 inches.
- Loosen slightly the screws holding the tracks to the front of the rails, and allow the tracks to seek an unbound position.
- Tighten the mounting screws and check the tracks for smooth operation by sliding the cabinet in and out of the rack several times.
- Tighten the front panel retaining screws once the cabinet is in place within the rack to complete the installation.
Rack Slide Maintenance
The slide-out sections of the tracks do not require lubrication. The dark gray finish on the tracks is a permanent lubricating coating. The track sections should be checked periodically for build-ups of dust or foreign material that might cause them to bind.
Removing the Unit

- CAUTION: To avoid possible damage to cables or connectors, be sure all cables are disconnected from the PDR100 or PDX103 prior to attempting to remove the unit.

- WARNING: The PDX103 is considered to be too heavy for one person to remove. The weight of the PDX103 exceeds 80 pounds. To avoid possible personal injury, do not attempt to remove the PDX103 by yourself.
- Loosen retaining screws and pull cabinet outward until all three slide sections latch.
- Press both track stop latch buttons (visible in the stop latch holes) and carefully slide the cabinet free of the tracks.
Electrical Installation
Power Source
These PDX103s are designed to operate from a single-phase power source having one of its current carrying conductors at or near earth ground (the neutral conductor). Only the line conductor is fused for over-current protection. Systems that have both current-carrying conductors live with respect to ground, such as phase-to-phase in multi-phase systems, are not recommended as power sources.
Mains Frequency and Voltage Ranges
The PDX103 operates at line frequencies of 50 or 60 Hz with nominal mains voltages from 100 to 240 Vac. A number of power cord options to support various power plug configurations are available. See Table 1.
Cabling to the PDX103
Extending the SCSI Bus
Figure 10. Cabling a PDR100 to a PDX103 Video Disk Expansion Unit
Figure 11. Passive SCSI Bus Termination Video Hard Disk System Configuration
Software Version
Disk Utility Program

